Navigator Class in Flutter
While using Flutter, the pages or screens that appear in the mobile app are known as the routes. Moving through the screens to the next in the app forms a stack of routes. Here, the StatefulWidget manages all of the routes in the background, also called “Navigator”.
This term is also referred for a type of class within the Flutter framework. By knowing the Navigator class will ease you to understand navigation system of Flutter. Let’s get started!
Navigator class- overview
The Navigator class in Flutter development offers navigational functions within these apps. This class will help you with the configuration process and the stack mutation methods. There are two types of sequences the Navigator provides here.
Navigator.pop-
returning to the previous screen from the presently active page.
Navigator.push-
this signifies the action of going to the next page.
Here is one example of these methods. The Navigator.push command uses BuildContext and PageBuilder as two sequential arguments. The following code for the example involves the MaterialPageRoute, typically used for route changing and transition animation management.
import 'package:flutter/material.dart';
void main() {
runApp(MaterialApp(
title: 'My App',
home: Main(),
));
}
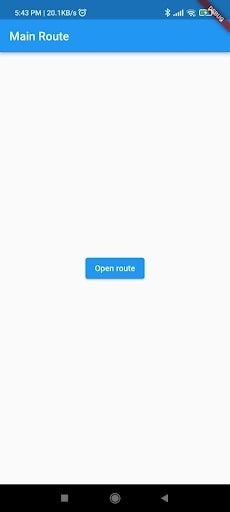
class Main extends StatelessWidget {
@override
Widget build(BuildContext context) {
return Scaffold(
appBar: AppBar(
title: Text('Main Route'),
),
body: Center(
child:ElevatedButton(
child: Text('Open route'),
onPressed: () {
// pushing SecondRoute
Navigator.push(
context,
MaterialPageRoute(builder: (context) => SecondRoute()),
);
},
),
),
);
}
}
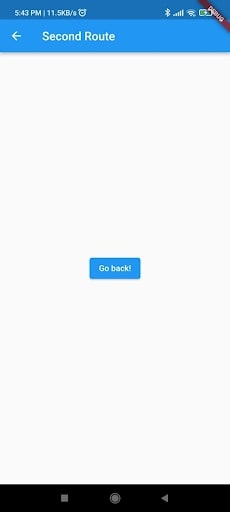
On the other hand, the Navigator.pop method uses the BuildContext and modifies the available route only.
class SecondRoute extends StatelessWidget {
  @override
  Widget build(BuildContext context) {
    return Scaffold(
      appBar: AppBar(
        title: Text("Second Route"),
      ),
      body: Center(
        child: ElevatedButton(
          onPressed: () {
// Removing SecondRoute
            Navigator.pop(context);
          },
          child: Text('Go back!'),
        ),
      ),
    );
  }
}
There are other active methods via Navigator, such as the *pushReplacement*, which prepares similar arguments to the push method. It takes the place of the current route so it is hard to go back to the previous route.
In mobile apps, the content is visible on the pages or screens which take up the entire screen. These full-screen elements in the context of Flutter are known as routes, and the Navigator widget handles them using these methods.
Navigator API usage
The navigator class and routes are helpful in case the user interface of your device aligns with this stack paradigm. For some platforms like the Android OS, users get a back button in their system UI. Using this, one can move between pages.
However, in the other platforms that didn’t include this type of navigation mechanism already set up, they can use AppBar. This inserts an automated back button in the screen for navigation. You will see AppBar within the Scaffold.appBar property.
The full-screen route navigation
It is possible to custom-build a navigator, but it is more user-friendly to utilize the pre-made one from the Router that the MaterialApp or WidgetApp widget developed.
Here is an example of the route via the MaterialApp widget:
void main() {
  runApp(MaterialApp(home: MyAppHome()));
}
Develop a MaterialPageRoute instance to push another new stack route, with a specific builder function for showing what elements appear on the screen.
Navigator.push(context, MaterialPageRoute(
  builder: (BuildContext context) {
    return Scaffold(
      appBar: AppBar(title: Text('My Page')),
      body: Center(
        child: TextButton(
          child: Text('POP'),
          onPressed: () {
            Navigator.pop(context);
          },
        ),
      ),
    );
  },
));
The definition of the widget does not involve child widgets but a builder function. This is because the route will adapt in different contexts based on the pop and push methods.
The named route navigation
After knowing the push and pop method-related routes, let’s discuss the process where the named route is available. The Navigator.pushNamed method uses two types of arguments- string and context. For this, you have to prepare two screens. After that, define the available routes within the MaterialApp.
This will set the initial and other routes for the page. Here is an example code for this section:
return MaterialApp(
      debugShowCheckedModeBanner: false,
      title: 'Flutter Demo',
      theme: ThemeData(
        primarySwatch: Colors.blue,
      ),

      initialRoute: '/',
    routes:{
      '/':(context)=>HomePage(),
      '/login':(context)=>LoginPage(),
      '/signup':(context)=>SignUp()

    }
    );
Then, with the “onpressed”, you can work with the Navigation.pushNamed() function to reach the login page:
onPressed: (){

              Navigator.pushNamed(context,'/login');
            },
Following that, go back to the previous screen using the Navigator.pop() function. Here are the codes:
onPressed: (){

              Navigator.pop(context);
            },
After running all of these sequences, you should carry out the action to see how the navigator class elements work in the app interface.
Conclusion
With the right steps and sequences, creating a suitable navigation system for Flutter apps is simple. If you want the best type of programming and fine-tuning help during this phase of the development process, you can hire Flutter developer. Please discuss your requirements with us.
Frequently Asked Questions (FAQs)
1. What is MaterialPageRoute in Flutter?
MaterialPageRoute class is one type of the modal route which will replace the entire screen with a platform-adaptive transition. For example, in android, an entrance transition for a page zooms in and fades in while the existing page zooms out and fades out. However, the exit transition is similar, but in reverse.
2. Define BuildContext in the app development
BuildContext is the one type of locator usually utilized to track each tree widget and locate them with their position in the tree. However, each widget of this class is passed to their build method. Also, be clear that the build method only returns the widget tree which the widget renders. So, BuildContext is unique to a widget.
3. How will the MaterialApp widget work in Flutter?
MaterialApp is the extension of the generic top-level widget offered by Flutter: WidgetsApp. It is a convenient widget that abstracts the various features needed for most mobile apps, such as setting up the navigator and using app-wide themes.