How To Set Up An Emulator For VSCode?
Go, JavaScript, Python, C++ and Node.js are just a few programming languages that may be utilized with VSCode, a powerful source code editor. Microsoft created VSCode for Windows so that it could be used to create GUIs, web, mobile application development , and often more.
One can utilize VSCode Setup instructions to install and establish VSCode. The emulator is a piece of hardware or software that allows any device to act like the next. The capacity of a software program in a digital system to mimic (emulate) another programme or instrument is a straightforward definition of this term.
While utilizing Visual Studio Code to construct software products, we must install them somewhere to test their functionality and GUI and make necessary adjustments. And yet whenever we have to check our output and make changes, we have to get it into an APK and access it through the mobile device multiple times.
Despite having to own every actual device, you may evaluate the software on a wide range of gadgets and Android API versions using an Android Emulator, which simulates Android phones on the PC.
What are the steps to Set Up the Emulator for VS Code?
A hardware or software tool known as an emulator allows any system to emulate the operations of some other software system. As a result, the emulator makes it possible for the hypervisor to use programmes, utilities, peripherals, and other elements intended for the visitor system. Let us have a look at the various method to place the emulator for VS code:
1. Utilizing Genny motion Emulator
Downloading Genny Motion Emulator and Virtual Box is the first step, followed by opening Genny Motion Emulator. After downloading the Virtual Box, download it. Then, use the Genny Motion tutorial to complete the required configuration of Genny Motion and learn how to configure virtual devices in detail.
Once the virtual unit is attached, Launch Genny Motionx or Virtual Box to launch the emulator. When Genny Motion is opened, the connected devices are displayed. Click the add (“+”) sign in the upper right-hand corner to add new connections whenever you browse a computer. One can see the virtual phone on your display after operating the equipment.
Once you route the script in Visual Studio Code, it will execute straight in the network drive, allowing users to evaluate the user interface (UI). It is because it appears on a smartphone, modifies any code changes, and then quickly reinstalls the machine by pressing CTRL+R to see the simplified modifications.
2. Utilizing Android iOS Emulator extension in VSCode:
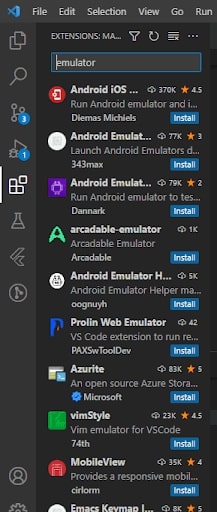
For this procedure, you must use VSCode’s Extension tab to look for and download the iOS and Android Emulator. The Extensions configurations option can be accessed by clicking the Settings option. You are now organized, and if you select the smartphone icon in the upper right corner, a list of possible virtualizations will appear.
Also Read: Flutter Vs React Native – From Developer Point Of View??
Step 1: Find and install the Android and iOS Emulator by using the VSCode Extensions option.
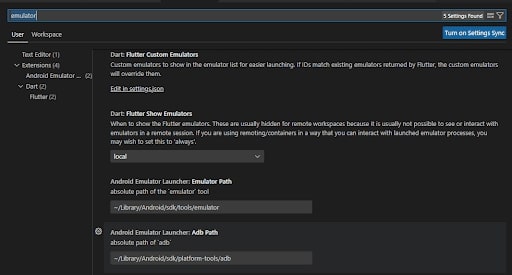
Step 2: Click on the Settings icon, then select the Extension Settings button to view the page shown in the following illustration.
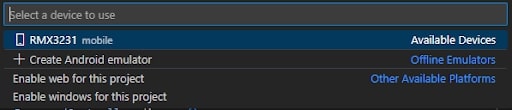
Step 3: Now that everything is in order, click the mobile symbol in the upper right corner to see a list of virtual devices that are accessible.
You can study the UI on a smartphone by selecting the unit, which will appear as a simulated mobile device whenever you select it. You can then make appropriate code changes and restart the equipment by pressing CTRL+R to see the revised modifications. Below is the coding:
It is necessary to have Android Studio and already developed Android Virtual Devices to use Android emulators.
Change the Visual Studio Code settings to include the Android Studio emulator code:
You could provide a general route or establish a default path for every software. The fallback will constantly be the primary route.
Default:
"emulator.emulatorPath": "~/Library/Android/SDK/emulator"
Mac:
"emulator.emulatorPathMac": "~/Library/Android/SDK/emulator"
Linux:
"emulator.emulatorPathWindows": "<yourAndroidHome>\\Sdk\\emulator"
Windows:
"emulator.emulatorPathWindows": "<yourAndroidHome>\\Sdk\\emulator"
OR
"C:\\Users\\<yourUsername>\\AppData\\Local\\Android\\Sdk\\emulator"
File -> Preferences -> Setting -> User Setting -> Extensions -> Emulator Configuration
The possibility to launch Android emulators in cool boot modus has been added. Please turn it on in Visual Studio Code’s settings.
Android Cold Boot: true

3. Utilizing AVD (Android Virtual Device) manager
To install AVD Manager with Android Studio and manage Virtual machines utilizing AVD Manager, you require Android Studio installed on the computer. The new digital smartphone you establish within AVD Manager will appear in VSCode as you do so. If you select No Device, the table of the computers for which you have installed the AVD Manager and browser will appear.
4. Utilizing Flutter:
The Flutter Device alternative must be selected from the bottom right corner of the main screen in VS Code. After selecting a network, the command palette will provide a list of all possible connections when you select the Flutter Device icon.
5. Direct Method:
Emulators are now started straight through code as of Dart Code version 2.13.0. But the Flutter app development tools support is required for this functionality. This modification has been visible in Flutter’s master channel, which implies that it would only display emulators while using an extremely subsequent Flutter SDK.
However, reaching the beta and development streams can take a bit longer. This functionality passed our tests with flying colours under Flutter 0.5.6-pre.61. To construct or use a Virtual Device, Android Studio isn’t required. Use only the avdmanager and SDK manager utilities provided by the Android SDK.
Conclusion:
Due to its portability, an extensive selection of plugins, and assistance from Microsoft, VS Code has been named the most popular code editor globally. Today multiple Visual Studio Code extensions are in need and help web developers work quickly and efficiently. An Android Virtual Device, or AVD, called the Android Emulator, was developed to emulate any particular Android operating system.
With Windows Emulator acting as a framework or environment, the Android application may be installed and operated on the computers. It might or might not be utilized based on the operator’s needs. It is advantageous to download and set up on the computer the ones the people already generated in the IDE.
Since they offer a good alternative for those without elevated Android phones with exemplary configuration, Android emulators are growing in popularity. Additionally, they offer PC accessibility to all mobile apps. Users can efficiently play a lot of games at once.
Hence, you will know how to set up the gadget for VSCode for a Flutter emulator. You can consult with Flutter experts from our company to get your project’s development support, resources, libraries, and widgets. If you want to know more about the Flutter framework, you can read our blogs. Click here!
Frequently Asked Questions (FAQs)
1. Why are the emulators required?
Most emulators are for playing video games which run on various operating systems. For instance, you can put the Mac operating system on your windows computer. However, an emulator will allow you to run the apps which usually do not want to work with your desktop.
2. What is the emulator, and how does it work?
An emulator is software or hardware that enables one computer system to behave like another. It will enable a host system to run the software or use the peripheral devices created for a guest system.
3. What are the controls for an emulator?
Usually, an emulator controls consists of the external and internal parts: Home, Back buttons and Volume control. For instance, the external parts control the device from the outside. Hence, external parts are known as emulator control keys and menus in an emulator.
Book your appointment now