An API syntax called GraphQL specifies how to retrieve data from one or more databases.
A growing community has been supporting and expanding this API query language since it was open-sourced in 2015 by a small company called Facebook (which has been using it for its mobile apps since 2012).
It was developed to address some structural issues that web and mobile app developers ran into as they began to make programs that were significantly more complex than before.
Facebook’s use case was to give users access to every aspect of the website through their mobile apps in 2011. At that point, they began to consider a fresh approach. A method that would streamline and organize traffic between clients and servers.
GraphQL was the result.
They enabled HTTP data management over a single endpoint. Your API responds to every request you make with the desired results. What I’m trying to say is that you won’t get anything else or less on the other end than what you actually require. Building apps that are much faster and more stable is made possible by determining the data that is needed client side rather than letting servers govern it.
No matter where the data is kept, it is grouped together by the type schema system into the many fields you can access. You can connect these to one another to make a single, straightforward request for the information you need.
Important definitions
Before moving on, ensure you completely comprehend the following words that will be used in the tutorial below:
Query: A query is what a client sends to a server to specify the necessary data. It would look like the following for our likely use case:
{
  players {
    first_name
  }
}
All of the players in our fictitious sports league’s first names are what you would receive in response to this query.
Schema: The plan for client and server communication. It details the sorts of data that can be retrieved, the questions that clients can make, and the connections between different types.
Resolvers: A generalized function used in all fields. It describes the connection between that field and the backend and retrieves data for that field from a database.
GraphQL vs REST APIs
You can tell from the numerous arguments this issue has already sparked on experts forums that it is impossible to properly compare the two. They are not the same, and REST APIs won’t be replaced by GraphQL the next day. The first is a query language, as I have said, and the second is an architectural idea.
A REST API can indeed be wrapped in GraphQL. If you want to use GraphQL without removing your current infrastructure, this is important to know.
However, because GraphQL addresses many of the issues that REST’s numerous endpoints produced, more and more developers will use it for their new APIs.
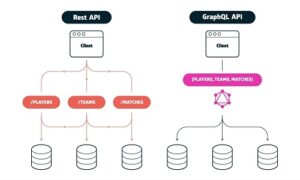
The latter requires that several calls be made to various endpoints for a single request, such as loading a page. When you grew to more complicated structures, it made the process slower. And because of that, using REST APIs may quickly turn into a big problem.
So, why choose GraphQL?
GraphQL is unquestionably the best choice to construct your server using in a few specific circumstances, such as:
- Since GraphQL supports all of them, numerous clients may simply write their own queries in whichever language they like.
- If you operate across many platforms, such as online, mobile, and applications.
- If your API offers a lot of customization.
What is Node.js Express?
Express is a Node.js web framework that is quick, unbiased, and simple.
For many years, and with good cause, it has been the most well-known Node.js framework.
On top of Node.js, it is a simple framework that offers essential web application functionalities. Numerous businesses that utilize Node.js frequently use it since it was one of the first tools available (IBM, Uber & more).
You can build a tonne of modules on top of it to address most use situations, like this one. Your best option for launching a new server using GraphQL is without a doubt Node.js Express, as the express-graphql module offers a shortcut to doing so.
Even though there are other Node.js options like Koa and Strapi, I choose to remain with the tried-and-true and keep to my strengths in this case.
Building a GraphQL server with Node.js Express
In this demonstration, I’ll use GraphQL, Express, and PostgreSQL to build and publish a straightforward API for a sports league. I’ll also use the Join Monster library to improve our searches. Frontend apps might then retrieve and utilize the data supplied into this server to display it to consumers.
Let’s do this!
1. Installing the required dependencies
There are a few items you’ll need before beginning in addition to the expedited package. Installing express-graphql is necessary since Express will use it to quickly build your API and the official Graphql implementation.
Run the below command in your project’s root directory to do this:
npm install express express-graphql graphql --save
2. Creating an entry point
You must create an API entry point once you’ve installed the required requirements. Create a server.js file at the project’s root to do this.
This enables you to launch your server using the short command node server.js.
3. Importing the dependencies
You can import the necessary dependencies established in the preceding step after your file has been prepared.
Just add the following code at the beginning of the server.js file:
const express = require('express')
const { graphqlHTTP } = require('express-graphql')
const graphql = require('graphql')
4. Building a GraphQL schema and a first resolver
With the use of a schema, you must specify what a client will query in order for GraphQL to function. To begin with, you’ll have the API respond with “Hello world!” anytime a user makes a request.
To achieve this, use GraphQLObjectType to programmatically create your schema. The first-level queryable fields will all be defined by this new variable.
const QueryRoot = new graphql.GraphQLObjectType({
  name: "Query",
  fields: () => ({
    hello: {
      type: graphql.GraphQLString,
      resolve: () => "Hello world!",
    },
  }),
});
The value(s) that your GraphQL API should return must be known. You must build what are known as resolvers to achieve this. In this case, you only want to answer with “Hello world!” when the user types hello. As a result, I had to provide both the resolver’s return type and the resolver itself inside the greeting field.
The following code may now be used to instantiate the schema:
const schema = new graphql.GraphQLSchema({ query: QueryRoot });
5. Building the Node.js Express app
The development of the Express server is the most recent step toward obtaining a basic GraphQL API.
const app = express();
app.use(
  "/api",
  graphqlHTTP({
    schema: schema,
    graphiql: true,
  })
);
app.listen(4000);
Here, I’ve built up a single API route and passed the graphqlHTTP middleware, which is where we configure the schema and the graphiql option, as a parameter.
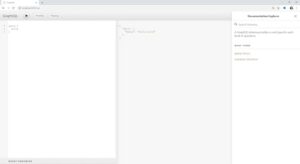
When the graphiql flag is set to true, a GraphIQL playground is immediately created so that you may query your API with code completion.
At this point, your server.js file should resemble the following:
const express = require("express");
const graphqlHTTP = require("express-graphql");
const graphql = require("graphql");


const QueryRoot = new graphql.GraphQLObjectType({
  name: "Query",
  fields: () => ({
    hello: {
      type: graphql.GraphQLString,
      resolve: () => "Hello world!",
    },
  }),
});


const schema = new graphql.GraphQLSchema({ query: QueryRoot });


const app = express();
app.use(
  "/api",
  graphqlHTTP({
    schema: schema,
    graphiql: true,
  })
);
app.listen(4000);
The API should be active and queryable if node server.js is launched from the command prompt and localhost:4000/api is accessed using a web browser.
6. Linking the API to a PostgreSQL database
You would presumably want to connect your API to an existing database in a real-world scenario, right?
Installing some form of database is a prerequisite for doing so. I’ll utilize Postgres, an open-source SQL database, in this situation. I’ll skip this section because the setup depends on your operating system, but you can always go to the official literature for instructions.
Just remember to save the superuser’s username and password since you’ll need them in the following step.
7. Creating the database
Have you set up your database? It is now your responsibility to set it up and make your tables. Create a database called league since you’ll be creating a public dataset for a sports league in this demonstration.
Connect to the database first by using the following command:
psql -h localhost -U {YOUR_USERNAME}
Then create the database with the following SQL query:
CREATE DATABASE league;
After it is finished, you may connect to it using the connect command.
connect league;
Let’s make a table with the teams, players, and matches now.
CREATE TABLE team (
  id SERIAL PRIMARY KEY,
  name VARCHAR (255)
);
CREATE TABLE player (
 id SERIAL PRIMARY KEY,
 first_name VARCHAR (255),
 last_name VARCHAR (255),
 team_id INT NOT NULL REFERENCES team (id)
);
CREATE TABLE match (
  id SERIAL PRIMARY KEY,
  date DATE NOT NULL DEFAULT CURRENT_DATE,
  winner_team_id INT NOT NULL REFERENCES team (id),
  loser_team_id INT NOT NULL REFERENCES team (id)
);
Don’t forget to add at least a few rows of placeholder data to each of our newly formed tables!
8. Installing up a driver to access our database
In order to do actual reads and writes to the database, you must first establish a connection to your database using server.js. In this situation, connect to a Postgres database from a Node environment by using the [pg](https://node-postgres.com/) driver.
A straightforward NPM command may be used to install it.
npm install pg
Then, put the subsequent code under your existing dependencies to build a new client.
const { Client } = require("pg");
const client = new Client({
  host: "localhost",
  user: "{YOUR_POSTGRES_USERNAME}",
  password: "{YOUR_POSTGRES_PASSWORD}",
  database: "{YOUR_POSTGRES_DATABASE}",
});
client.connect();
9. Updating the schema and building new resolvers
You may construct new GraphQLObjectTypes and connect them to your schema as you presumably want to use your API for more than just a simple Hello World!
Install Join Monster and import it into your project first, though.
npm install join-monster
const joinMonster = require("join-monster");
This module, which functions as a substitute for DataLoader, converts user’s GraphQL queries into SQL statements, preventing you from making several pointless calls to the database. Once you’ve finished, you may specify the new types:
const Player = new graphql.GraphQLObjectType({
  name: "Player",
  fields: () => ({
    id: { type: graphql.GraphQLString },
    first_name: { type: graphql.GraphQLString },
    last_name: { type: graphql.GraphQLString },
    team: {
      type: Team,
      sqlJoin: (playerTable, teamTable, args) =>
        `${playerTable}.team_id = ${teamTable}.id`,
    },
  }),
});


Player._typeConfig = {
  sqlTable: "player",
  uniqueKey: "id",
};


var Team = new graphql.GraphQLObjectType({
  name: "Team",
  fields: () => ({
    id: { type: graphql.GraphQLInt },
    name: { type: graphql.GraphQLString },
    players: {
      type: graphql.GraphQLList(Player),
      sqlJoin: (teamTable, playerTable, args) =>
        `${teamTable}.id = ${playerTable}.team_id`,
    },
  }),
});


Team._typeConfig = {
  sqlTable: "team",
  uniqueKey: "id",
};
The name of the table and the distinct id of each row inside the type’s configuration object, _typeConfig, are both supplied in the code above. In this manner, Join Monster will be able to build a suitable SQL statement for your table.
You’ll also need to connect your data because your data model involves relationships. Fortunately, connecting data just requires putting the SQL statement’s ON clause within the sqlJoin key. The GitHub repository for this example has a complete list of the kinds!
Let’s finish by adding the necessary new fields to our QueryRoot variable.
const QueryRoot = new graphql.GraphQLObjectType({
  name: "Query",
  fields: () => ({
    hello: {
      type: graphql.GraphQLString,
      resolve: () => "Hello world!",
    },
    players: {
      type: new graphql.GraphQLList(Player),
      resolve: (parent, args, context, resolveInfo) => {
        return joinMonster.default(resolveInfo, {}, (sql) => {
          return client.query(sql);
        });
      },
    },
    player: {
      type: Player,
      args: { id: { type: graphql.GraphQLNonNull(graphql.GraphQLInt) } },
      where: (playerTable, args, context) => `${playerTable}.id = ${args.id}`,
      resolve: (parent, args, context, resolveInfo) => {
        return joinMonster.default(resolveInfo, {}, (sql) => {
          return client.query(sql);
        });
      },
    },
    //...
  }),
});
As you can see, I utilize a Join Monster function within the resolvers, which accepts the query information as an input and passes the SQL statement I’ll use to perform the query through the pg client as a callback.
If you’re wondering what the where the column is, it’s a brand-new field that Join Monster uses to explain the where clause in the SQL statement that is created. Depending on your needs, you may personalize it any way you like.
Be aware that if your dataset is substantial, you should probably add a paging system to stop users from choking your database with enormous operations.
10. Mutations
It’s nice to query the database, but it doesn’t help much if you can’t add any data to it.
Fortunately, GraphQL has a mutation type that enables you to do just that. To do this, follow the identical steps as previously but manually build your SQL query using the pg client.
const MutationRoot = new graphql.GraphQLObjectType({
  name: "Mutation",
  fields: () => ({
    player: {
      type: Player,
      args: {
        first_name: { type: graphql.GraphQLNonNull(graphql.GraphQLString) },
        last_name: { type: graphql.GraphQLNonNull(graphql.GraphQLString) },
        team_id: { type: graphql.GraphQLNonNull(graphql.GraphQLInt) },
      },
      resolve: async (parent, args, context, resolveInfo) => {
        try {
          return (
            await client.query(
              "INSERT INTO player (first_name, last_name, team_id) VALUES ($1, $2, $3) RETURNING *",
              [args.first_name, args.last_name, args.team_id]
            )
          ).rows[0];
        } catch (err) {
          throw new Error("Failed to insert new player");
        }
      },
    },
  }),
});


const schema = new graphql.GraphQLSchema({
  query: QueryRoot,
  mutation: MutationRoot,
});
You should use caution while making your database accessible to the general public since anybody can edit the data.
You should include authorization business logic in your code if you wish to restrict writing access to a select group of users.
And that’s it guys; we’re all done!
Conclusion
In this article, you learned how to create a GraphQL API server in Node.js using the Express framework. A single /graphql endpoint on the GraphQL server may manage incoming requests to query the data store. The main Query type and a resolver to retrieve the appropriate data for those types were all included in the schema of your API.
Hopefully, this post has helped clarify GraphQL and given readers fresh insights into the tasks that may be completed with it. Many tools are available to assist with the more difficult elements of dealing with GraphQL, such as authentication, security, and caching, but knowing the easiest way to set up an API server should help you comprehend the fundamentals of GraphQL. Hence, at BOSC Tech Labs, we recognize the value of GraphQL and incorporate it into our development processes to deliver high-quality solutions to our clients.
Frequently Asked Questions (FAQs)
1. What is the best language for GraphQL?
There are GraphQL server tools available for the majority of widely used languages. Still, due to the ecosystem of tools developed for GraphQL in JavaScript, we suggest utilizing Apollo Server (Node. js). Additionally, node servers can be installed almost anywhere, including the edge.
2. Why should I use GraphQL?
GraphQL significantly reduces the amount of time and bandwidth required for network round trips to the server by allowing numerous resource requests to be made in a single query call. Resolving dependent resources from earlier requests also helps save waterfall network requests.
3. Which API client works with GraphQL the best?
The desktop application for GraphiQL, which runs on Windows, Mac, and Linux, is called the GraphiQL IDE. When it comes to submitting GraphiQL queries and examining the schema of any GraphQL API, GraphiQL does a respectable job. For personal projects that require essential functionalities, GraphiQL is a viable choice.
Book your appointment now